Day#13: Classic Skull
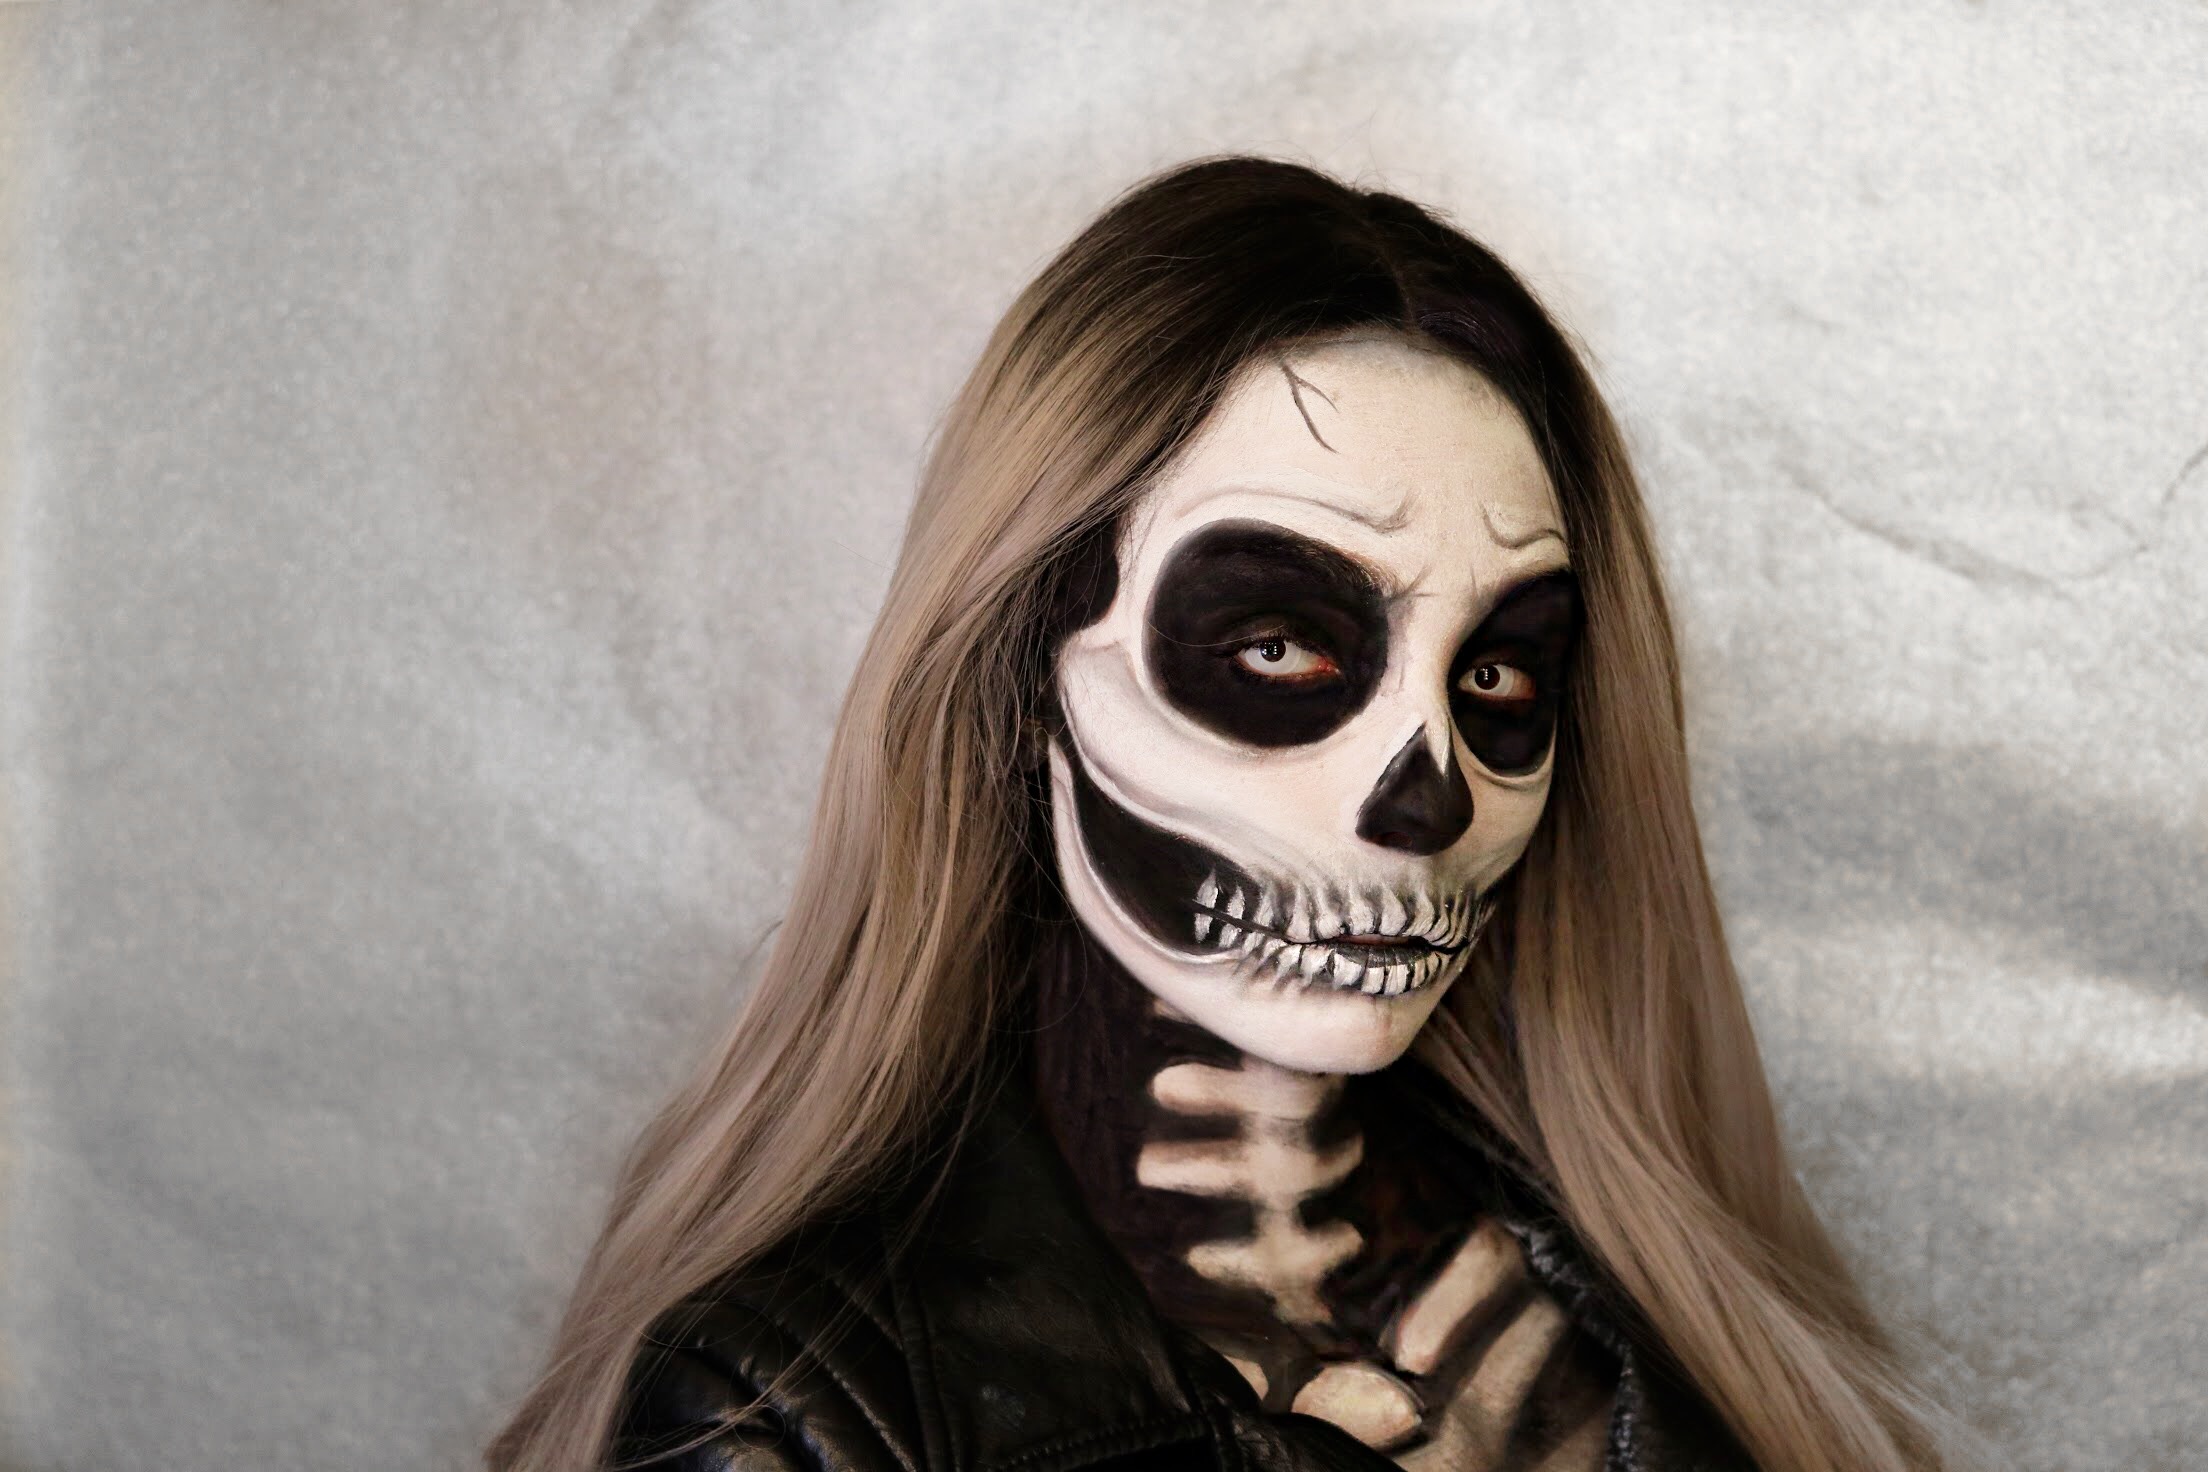


Classic Skull
It only takes 4 products!
This look is so classic and stunning when done correctly. It’s not difficult, just time consuming. And this is perfect if you’re on a budget because you only need 4 products: black and white face paint, and black and white eyeshadow. I use the Snazaroo face paint because it doesn’t take nearly as many layers as most other water activated body paints to create the opacity and consistency necessary to really sell this look. The eyeshadow can really be anything, as long as the pigmentation is excellent! I used my favorite Saucebox Etude Palette.
For costume pieces, I kept it really simple with a grey wig and a faux leather jacket. If I were wearing this out, I’d definitely want a buddy to help me paint all the areas I can’t reach, of course also depending on the outfit. My wig is from Amazon and its amazing quality. My jacket is from H&M a million years ago, but any all black outfit would look bomb for this look. Also, badass contacts help. Mine are from ttdeye, and as I always say, they are my favorite because I can get even the creepiest contacts in my prescription!
Okay, let’s get this thing started, shall we?
Outline
Start with a clean, bare face. With your white face paint and a small brush, start outlining where your bones are going to be. USE A REFERENCE PHOTO OF A REAL SKULL! I can’t emphasize enough how important this is if you want to get the placement and sizing of all the bone shapes just right. Definitely feel around your face to see where your real bones are as well. This will really help to make everything look proportional and fit your face. If you’re going for hyper-realism with this, you’ll probably want to use more earth-toned eyeshadows and an off-white paint. It will take an extra long time if you want to go that route, but it is totally an option! I wanted to keep it simple and stark with the darkest black and the brightest white for a dramatic effect.
Okay, back to the outline specifics, keep in mind where the black spaces will be, i.e. your eyes, the tip of your nose, and underneath your cheekbones. When you actually create your shapes with the white paint, leave complete circles where your black paint will go later. You don’t want to completely paint your face white and then try to go in with black because it will only turn into a grey mess. Don’t stress about the teeth, we can do that part in more detail later, just make sure your upper lip area and lips are painted white. About an inch outward on either side of your mouth, you can leave space for black because that area is boneless. Feel free to use my photos as your reference as well. Keep in mind that the edges of your face are going to be black, so plan on making space for that, leading all the way into your hairline. If you’re wearing a wig, still do this step.
Fill in the bone outline with your white face paint now. It may take a couple layers, but in the end it should look opaque and smooth. You shouldn’t see any skin underneath or have any patchy areas. Let each layer dry before applying another.
Holes
As far as your eyebrows…if they’re dark like mine and if you’re lazy like me, you can just include them in your black eye holes. If you find that makes the eye holes too big or strange looking on your face, you can try to layer over them with white paint. If they’re dark, you may want to block them out before hand so that the paint lays easily on top. For a detailed explanation on how to block out your brows, read my post about it here. If you do this, keep in mind that the water activated paint may start to break down the washable glue stick used to block the brows, so be careful about how much water you use in that area.
Fill in the “holes” we created with our outline with black face paint. Make sure the brushes you use are synthetic and designed for paint. Actual paint brushes are perfect for this. The edge of the brushes are important because it makes filling things in so much easier when the brush doesn’t have crazy frayed edges. Especially since you’re trying to go right up against the white lines, you need all the help you can get from your brushes. Anyway, make sure all your holes are black as night. This may take a couple of layers. Let each layer dry completely before adding another. Don’t forget to paint your ears completely black.
Now we can do the teeth! This is my favorite and least favorite part at the same time. It takes some focus and a steady hand, and a little chunk of time to get these babies looking like real teeth and not like chicklettes. Take your black paint and a very fine detail brush, and create vertical lines from above your upper lip all the way down, a bit past your bottom lip. The first one should be directly in the center of your mouth area to make sure your two “front teeth” are in the right place. The lines should be longest in the center of your mouth, and gradually get smaller toward the corners of your mouth. Extend these lines onto the little inch of white we left on either side of the mouth before getting to the black holes on the cheek areas. You also want the tops and bottoms of the vertical black lines to curve a bit, so that we can get an idea of where to shade with eyeshadow later. This is also to give the illusion of the way real teeth curve as they recede backward on either side of the jaw, if you’re looking from a straight-on perspective. The direction of the curves should be outward from the center of the face. Keep looking back at my photos to see what I mean. This curved effect is also why we need to make the lines smaller toward the ends. The back teeth need to appear smaller than the ones in the very front because they would be sitting further back in the mouth.
Okay, great. We have some fancy lines on our mouth. Now what? Glad you asked. Now is our chance to make the tooth shape more realistic. I’m thinking Hershey’s kisses or tear drops for the shape of each tooth on the top, and upside down ones on the bottom. In other words, you want to fill in the edges on either side of each tooth with black paint. Also make a black line on the very inside of your lips so that the natural curve of your lips doesn’t make the teeth appear too long or large from the front.
Shading
Eyeshadow time! Grab your black eyeshadow and start creating the details. You’ll want to use the size brush that corresponds to the size of the area you’re working on. For the teeth, use a tiny one, for the hairline and around the sides of your face, use a larger one. Basically, you just want to shade in all the areas that would naturally recede. Start by going around the edges of all the “holes” to give a nice blended edge to them all, as opposed to a harsh line of one color next to the other. But don’t blend too much! Now with a detail brush and some more black shadow, make the divets in the bones. To do this, leave a small space between where the edges of the bones meet the black holes, and create a black faded line with the most pigmentation on one side. As a general rule, the most pigment should be on the top edge of where you create the line, and the shading should blend out toward the bottom. This is the case for most of the horizontal shading lines, like the brow bones, bottom eye socket bones, and the bottom of the jaw. The reason I did it this way is because I’m imagining my light source coming from the top, and this is how the light would cast shadows in that case. The sides of the face, or any vertical/slanted lines are a little different. Let me show you…

For the areas on top of the cheekbones and coming up from the teeth, the most pigmentation should be on the bottom, with the rest fading upward. Create little lines coming outward, into the cheekbones from the teeth. This will make sure the teeth still look connected to the main bone. Yes, that’s the technical term…main bone. You get me.
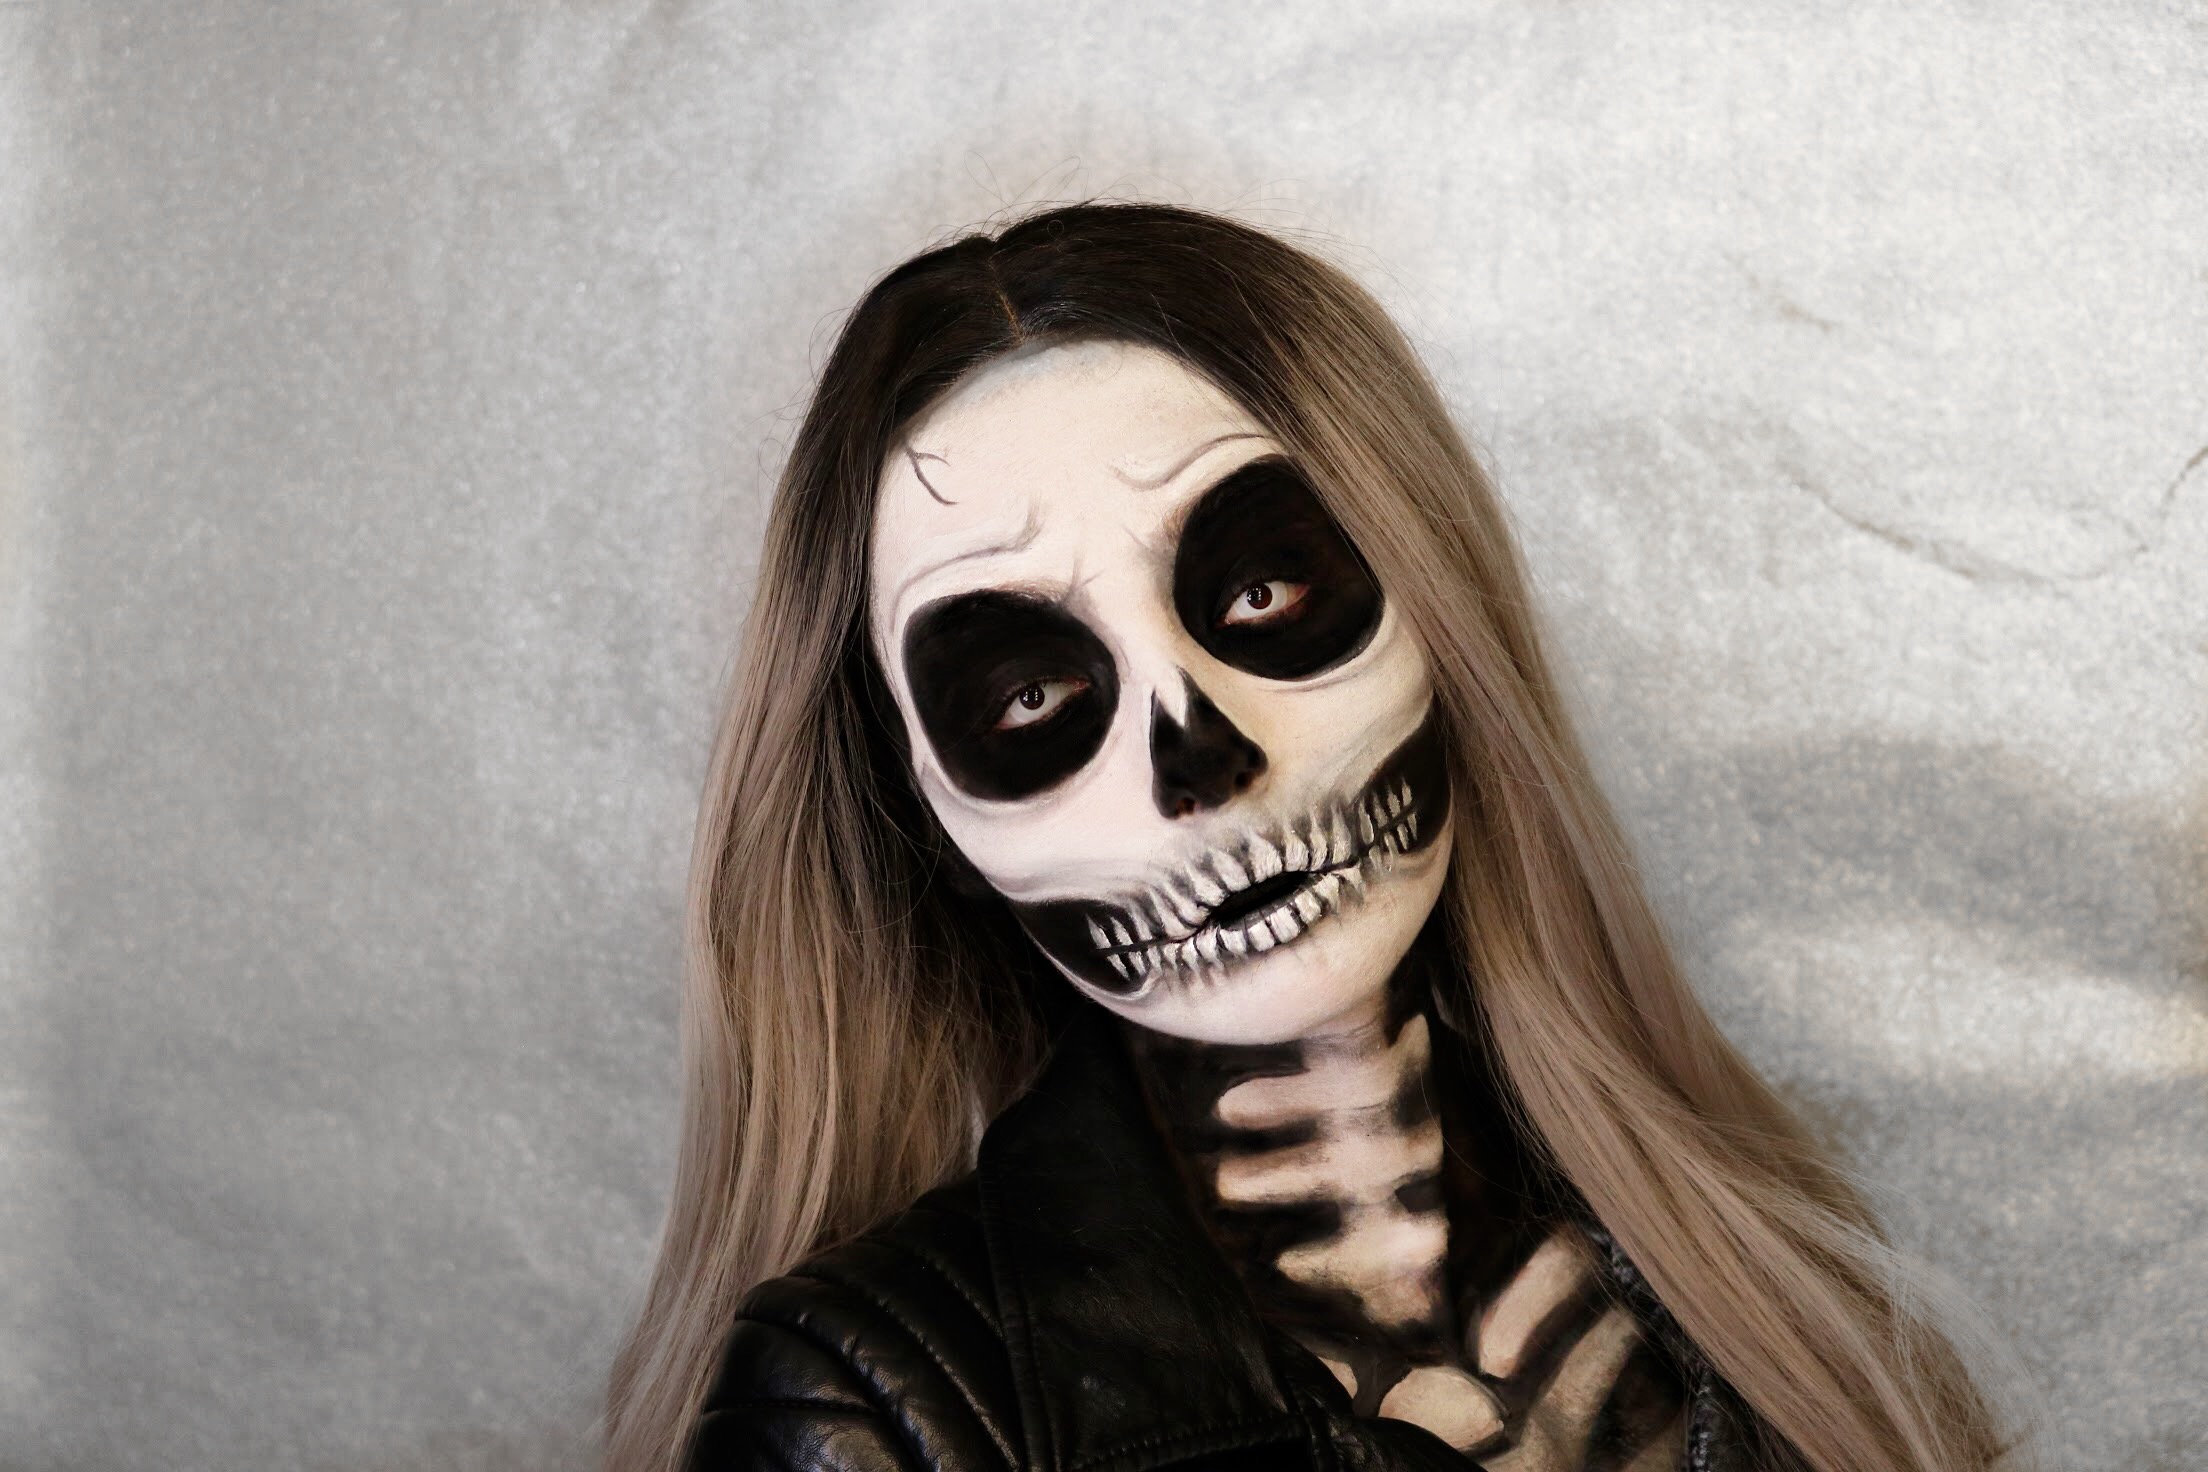
You can add little cracks in your skull with black paint and shadow anywhere you like. I added one on my forehead for a little interest as you can see here. Also pat some of that black eyeshadow anywhere that is supposed to be super black but looks patchy. Make sure your eyes are super black with extra shadow because this is where the most creasing tends to happen over time. Also around the nose.
Time to take this party down the neck and chest. This part is much easier if you switch to larger brushes, not only because you can cover these larger areas in less time that way, but because the width of the bones we need to paint is just about the same width of the brushes. Yay! Start with white first again like before. Think about it like creating white horizontal stripes (vertebrae) down your neck and connect them all at the center with a vertical stripe (spine). You can feel around your real bones to find exactly where to paint your collar bones. Just paint over right where they are and extend that line outward. In the middle of the collar bones, I just made a little sideways egg shape. Under that, I made vertical stripes following the same slight upward angle as my collar bones. Again, paying attention to the way your real bones actually curve and are placed will help this look legit. Go in with your black paint and fill the remaining areas of skin. If you want your arms showing (or any other area you’d need to paint), look at a reference photo to see how they should be shaped. Now shade! Take your black eyeshadow and a medium sized brush to shade around the edges of the bones, helping them appear more rounded. Go over your “spine” bone in the center, between each “vertebrae”. Down on the bones of your chest cavity, shade on the outside of where that spine bone would come down through the middle. Keep looking back at my photos for reference, to see what I mean. Make sure to set the white with the white eyeshadow and the black paint with black eyeshadow as best you can. This will help it from moving and smudging if you sweat. In my leather jacket, under my hot filming lights, I sweat and the paint got all over the place. I spent a while trying to wipe down the inside of my jacket because I skipped the setting part on my neck and chest. Don’t skip it! Also, don’t forget about the sides of your neck. Even if you don’t have anyone to help you paint the back side of your neck and back, still make sure the look appears cohesive from the front by blacking out the sides of your neck. Basically, you don’t want to be able to see any open skin from the front. P.s. you may not even bother with painting the back because your awesome wig will be covering that area up.
Lastly, add your wig and make sure to blend the edges of it with the black perimeter you painted earlier. It is important to make sure the edges of your face (with the exception of the jaw bone area leading back to your ear) are not harsh black painted lines. They should have a soft gradient with the eyeshadow. The reason for this is because we don’t want it to appear like a perfect skull with a random head of hair floating on top of the head, not connected to anything if there is an illusion of negative space. Instead, we just want to shade it to make sure we sell the curved aspect of the top and sides of the skull bones, so we can tell the hair is still attached to something.
Now you look totally badass! Skulls are one of my favorite things to paint. There are TONS of different ways and styles to paint a skull, but keeping it classic like this is what I love about this look. It’s not extremely realistic, its not too scary, its not a sugar skull, it doesn’t have a ton of extra “stuff” like glitter, sfx, etc. Its just a simple skull. And that’s how I roll. I’d LOVE to see your recreations of this look, so make sure to follow me on instagram and tag me so that I can see them! Thanks for getting down to the bare bones of this look with me (lol) and I’ll see you tomorrow for more 31 days of Halloween!
